Dash User Manual

Introduction
This manual describes how to get started with your CamDo Dash. The CamDo Dash is a low power device that interfaces with HERO4 and HERO3+ Black cameras. Dash turns the GoPro into a high quality dashcam by turning it on and starting recording when the vehicle turns on and turning it off when the vehicle turns off. It has a number of modes of operation to give you flexibility in setting different run-on times for recording. It also supports scripting using CamDo custom camera firmware.
Hardware List
- HERO4/HERO3+Black camera (Purchased Separately - see camera compatibility tab here)
- CamDo Dash
- CamDo Wired Remote (included in Dash package)

Operation
- Ensure your HERO4 camera is upgraded to v05.00 or higher (Hero3+Black to v03.03 or higher). If you are not sure, run the GoPro app, connect to your camera, and check in Settings -> Camera Info. Alternatively go to theGoPro website and apply the update manually using these instructions.
- Insert Dash into your camera. The LED will flash corresponding to the mode it is configured to. The default mode is 1. SeeDash Modes below for a complete list of configurations.
- Mount the camera and Dash to your vehicle with your chosen mounting system. We recommend the RAM mounts system which can be purchased on our Dashcam pack page.
-
Plug a USB cable into Dash and the other end into your vehicle’s accessory jack. Some vehicles come with USB connections whereas others will need a cigarette lighter USB charger/adapter.
NOTE: Dash relies on power being connected/disconnected on vehicle turn on/off. Some vehicles however have cigarette lighter / USB power sources that are always on regardless of whether the vehicle is on. Please plug into the outlet that is tied to the ‘Accessories’ power supply of your vehicle, so that power to Dash turns on/off when the car turns on/off. Dash uses a mini-USB connector, the same connector which is on GoPro HERO3 and HERO4 cameras.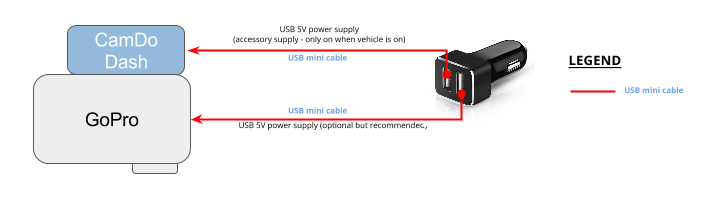
- When your vehicle turns on, USB power will be supplied to Dash, which turns the camera on
- When your vehicle turns off, USB power will be removed from Dash. Dash will take the appropriate action as per the mode table below. This will be either to turn the camera off immediately, or wait for a run-on time before turning the camera off*. Modes 4 and 8 will NOT automatically turn the camera off.
- Set your camera into the appropriate startup defaul settings. Check out our blog post for a more detailed explanation here.
- If using the HERO4, optionally, you may connect the CamDo Wired Remote (included with your Dash) to Dash’s “Config/Highlight” jack. Once the camera is recording video, you can apply a highlight tag to the recording by tapping the wired remote button.
- Remember to set your camera’s auto-off mode to 'never' to avoid unexpected results. For example, if you have set auto-off to 1 minute, yet have Dash set to Modes 5 through 8, the camera will still turn off after 1 minute of inactivity.

Setting up Dash
How to enter configuration mode
- Insert the wired remote into the “Config/Highlight” port and hold the button down while plugging Dash into the camera to enter programming mode. The LED will flash to indicate what mode it is currently set to.
- With Dash in programming mode, each press of the button will advance Dash to the next mode of operation (see table of modes below) and will continue to flash periodically the same number of times as the mode it is presently set to.
- Once you have reached the desired mode, just unplug Dash from the camera to exit programming mode and save the new setting. Configuration is now complete.
- If you now plug Dash back into the camera without the holding down the button of the remote, Dash will operate in the power mode you have selected. The LED will flash the same number of times as the mode you just set it into once and will not continue to repeat the mode indicator flashes. You are now ready to apply power to Dash’s USB input to begin operating in the selected recording setting.
Dash Modes
|
Mode (Corresponds to the # of LED flashes when plugged into the camera) |
Camera Action / Operation |
|
|
USB power received |
USB power removed |
|
|
1 |
Turn on and start recording |
Stop recording and turn off |
|
2 |
Turn on and start recording |
Continue recording for 1 minute, then stop recording and turn off |
|
3 |
Turn on and start recording |
Continue recording for 10 minutes, then stop recording and turn off |
|
4 |
Turn on and start recording |
Do nothing |
|
5 |
Turn on |
Turn off |
|
6 |
Turn on |
Wait 1 minute (note camera may not be recording in this mode eg if using scripts), then stop recording (if recording) and turn off |
|
7 |
Turn on |
Wait 10 minutes (note camera may not be recording in this mode eg if using scripts), then stop recording (if recording) and turn off |
|
8 |
Turn on |
Do nothing |
HiLight Tags (HERO4 only)
- Once recording, if you tap the wired remote button a HiLight tag will be applied to your footage. HiLight tags mark specific moments in your video as they happen to make it easy to locate important moments when viewing the footage using GoPro Studio.
FAQ’s and Troubleshooting
Check out the FAQ's and Troubleshooting on the main Dash documentation page.